Getting Started with TabSight
Download & Install
- Download the TabSight DMG from corixa.io
- Open the DMG and drag TabSight to your Applications folder
- Launch TabSight from Applications or Spotlight
Grant Automation Permission
When you first launch TabSight, the dock panel expands and asks you to grant browser access. Click Grant Access for each browser you want to use.
macOS will show a permission dialog for each browser. Click Allow to let TabSight read your open windows and tabs.
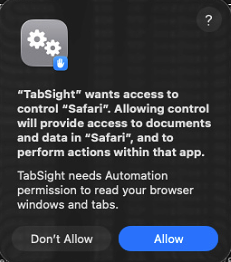
Safari permission prompt
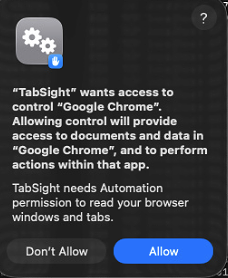
Chrome permission prompt
If You Clicked "Don't Allow"
You can fix this in System Settings:
- Open System Settings → Privacy & Security → Automation
- Find TabSight in the list
- Enable the toggles for Safari and/or Google Chrome
- Restart TabSight
Important
TabSight cannot function without Automation permission. This permission only allows reading window/tab info and controlling tab switching — it cannot access passwords, browsing history, or cookies.
First Launch
After granting permission:
- A thin dock strip appears on the right edge of your screen
- A menu bar icon appears (may be invisible on macOS Tahoe)
- Click or hover over the dock strip to expand it
- You will see all your browser windows and tabs listed
Understanding the Interface
- Collapsed dock — Thin strip showing tab-stack icon and tab count badge
- Expanded dock — Full panel with header toolbar, search bar, and tab list
- Header toolbar — Mode picker, New Window, Refresh, Settings, Coffee/Tip, Quit
- Tab list — Windows with their tabs, or flat tab list in compact mode
Next step: Learn how the Dock Panel works, or jump straight to Tab Management.